Automatic Generation of Swagger Specification In ExpressJS Applications
- 6 minutes read - 1103 wordsUpdate (May 13, 2025): If you’re starting a new project, I’d highly recommend using the NestJs framework, which has a dedicated module for swagger document generation that is much easier to implement and maintain.
As a developer, one of the tasks that ranks up there with how mundane and stressful it can be is creating or updating a Swagger spec documentation with all the necessary parameters and responses.
A couple of the packages I encountered like swagger-autogen help with the automatic construction of Swagger spec documentation but they only populate the endpoint paths. When it comes to populating the parameters and responses of each endpoint path, one has to manually annotate each route with the proper parameter and response schema definitions which is the mundane part because you have to repeat that process for all your routes.
Enter [express-oas-generator]https://www.npmjs.com/package/express-oas-generator)!
I have to admit, I faced a bit of a challenge trying to get the package to work as I expected before finally getting it right, hence this article.
For the sake of this article, I’d like to believe you have a working understanding of the basics of setting up Express.js and can also install the package as specified in the documentation. Now, let’s dive into what worked for me.
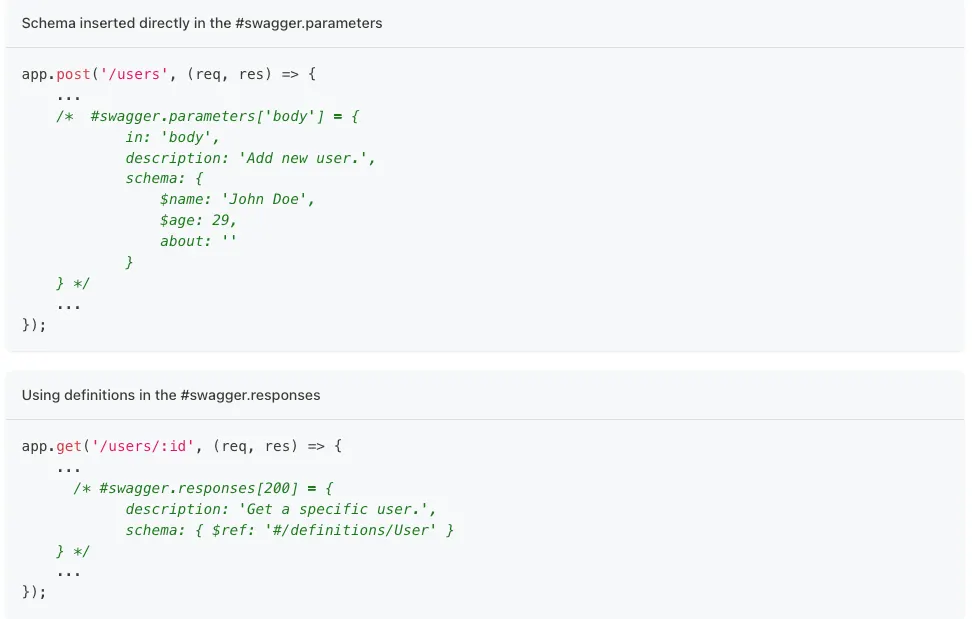
You need to create a swagger config file. Let’s say swagger_config.js;
const { SPEC_OUTPUT_FILE_BEHAVIOR } = require('express-oas-generator');
const _ = require('lodash');

const swaggerConfig = {
  predefinedSpec: function (spec) {
    _.set(spec, 'securityDefinitions.bearerAuth', {
      type: 'apiKey',
      name: 'Authorization',
      in: 'header',
      description: "Please enter your token with 'Bearer ' prefix (e.g., 'Bearer your-token-here').",
    });
    _.set(spec, 'security', [{ bearerAuth: [] }]);
    _.set(spec, 'schemes', ['https', 'http']);
    return spec;
  },
  swaggerUiServePath: 'v1/api-docs',
  specOutputPath: 'src/docs/swagger_output.json',
  ignoredNodeEnvironments: ['production', 'qa'],
  alwaysServeDocs: false,
  tags: ['items', 'orders'],
  specOutputFileBehavior: SPEC_OUTPUT_FILE_BEHAVIOR.PRESERVE,
};

module.exports = swaggerConfig;
predefinedSpec: a function that takes in additional specification parameters you can add to your generated swagger file.
swaggerUiServePath: Swagger UI path for your REST API (default value is api-docs)
ignoredNodeEnvironments: An array of strings representing environments you want to ignore swagger generation in. It checks process.env.NODE_ENV for the environment the app is currently deployed on. If you set NODE_ENV as dev, a Swagger spec documentation would be generated. If you set it as qa, it doesn’t. It has a default value of [‘production’]
alwaysServeDocs: false represents not showing the swagger page if the app is running in the ignored node environment. true doesn’t respect that constraint. It will show the swagger page regardless of whether the app is running in the ignored environment or not.
tags: It helps with grouping your endpoints. all the matching route paths are grouped based on what’s in the array. If it doesn’t match, it is grouped under default on the swagger page.
specOutputFileBehavior: Takes in either one of two enum values; ‘PRESERVE’ and ‘RECREATE’. PRESERVE just appends to the existing Swagger spec document and never updates existing schema definitions that have already been defined. RECREATE starts the Swagger spec documentation from scratch again each time the application restarts.
Now, that’s all for the more straightforward part.
To make use of the middleware as specified in the documentation, you need to invoke the responses handler immediately after instantiating app so it is the very first middleware, and then setting the requests handler as the very last middleware;
const express = require('express');
const swaggerConfig = require('path/to/swagger_config');
const expressOasGenerator = require('express-oas-generator');

const someOtherMiddleware = require('path/to/some-other-middleware')
const anotherMiddleWare = require('path/to/another-middleware')

const itemsRouter = require('path/to/items/router/file')
const ordersRouter = require('path/to/orders/router/file')

const app = express();

/**
 * @info invoke handleResponses as the first middleware
 */
expressOasGenerator.handleResponses(app, swaggerConfig);

/**
 * @info Invoke all other middlewares and routes here
 */
app.use(someOtherMiddleware)

app.use(anotherMiddleWare)

app.use('/items', itemsRouter)
app.use('/orders', ordersRouter)

/**
 * @info Invoke handleRequests as the last middleware
 */
expressOasGenerator.handleRequests();

module.exports = app;
There are a few things to note to make this work properly;
- As mentioned in the documentation, all the middleware and route paths must invoke the next middleware function for the requests handlerto work as expected:
app.get('/v1/order/:id/find', (req, res) => {
    const data = {
        message: 'Order fetched successfully!',
        success: true
    };

    return res.status(200).json(data);
});
becomes;
app.get('/v1/order/:id/find', (req, res, next) => {
    const data = {
        message: 'Order fetched successfully!',
        success: true
    };

    res.status(200).json(data);
    next()
});
- If you have an authentication middleware or a middleware that restricts access to your routes by default, you’ll need to exclude the routes that will be serving the Swagger spec documentation. Let’s say someOtherMiddleware is a middleware for authentication, you can specify the routes in an array variable, and check if the request path matches any pattern with the micromatch package. Invoke next() if there’s a hit. If not, go ahead with the authorization check. const micromatch = require(‘micromatch’);
const excludedRoutes = [
  '/v1/api-docs',
  '/v1/api-docs/',
  '/v1/api-docs/*',
  '/v1/api-docs/*/*',
];

const authenticateRequest = async (req, res, next) => {
  try {
    if (micromatch.isMatch(req.path, excludedRoutes)) {
      return next();
    }

    /**
     * @info Authentication Logic here
     */

    next();
  } catch (error) {
    console.log('Error in authenticateRequest =>', error);
    return res.status(401).json({ message: `Invalid Token: ${error.message}` });
  }
};

module.exports = authenticateRequest;
- As it is common practice, there’s usually a middleware that acts as a final catch-all for requests that don’t match any route or have not been handled by other middleware. Such middleware should be placed after the requests handler middleware.
...
expressOasGenerator.handleRequests();

module.exports = app;
becomes;
...
expressOasGenerator.handleRequests();

app.use((req, res, next) => {
  if (!res.headersSent) {
    errorResMsg(res, HttpStatus.NOT_FOUND, ENDPOINT_NOT_FOUND);
  }
  next();
});

module.exports = app;
Ordering it this way ensures that the Swagger documentation page shows up and does not return an endpoint not found error when you attempt to access the Swagger page. Also, theres.headersSent property is checked to know if the HTTP response headers have already been sent to the client. If we don’t perform the check, the app will throw the error below indicating that the response headers have been set whenever a request to your app has been fulfilled;
Error [ERR_HTTP_HEADERS_SENT]: Cannot set headers after they are sent to the client
    at ServerResponse.setHeader (node:_http_outgoing:703:11)
...
To save yourself the headache from the last highlighted issue, since ideally, the swagger generation should be on your local machine during development and not when deployed implying that the swagger output file would be static once deployed, leverage the swagger-ui-express package to serve the Swagger spec documentation and comment out all the express-oas-generator middleware handlers and just set up a route to serve the swagger spec documentation;
const express = require('express');
const app = express();
const swaggerUi = require('swagger-ui-express');
const swaggerDocument = require('./swagger_output.json');

app.use('/v1/api-docs', swaggerUi.serve, swaggerUi.setup(swaggerDocument));
That about sums up all I had to do to set up automatically generating Swagger specifications documentation. Thank you!